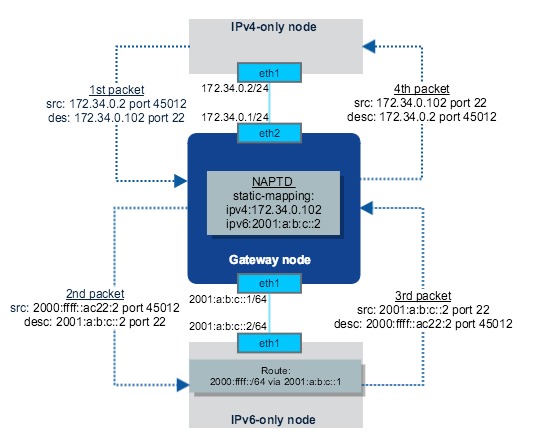
运行 NAPTD 的 Linux Box 的 IPv4 到 IPv6 静态 NAT-PT
- Get link
- X
- Other Apps
如果仅 IPv4 网络中的客户端想要访问仅 IPv6 网络中的服务器,则可以在 2 个网络之间设置一个 Linux 盒,作为网关。它运行NAPTD软件,该软件执行IPv4到IPv6 NATing。
我将设置3个虚拟机来模拟此设置。
网络拓扑为:
3 个 VM 运行 RHEL/CentOS 7.2 Linux。
IPv4 节点设置
通过编辑文件设置 ipv4 地址:eth1ifcfg-eth1
[root@ipv4 ~]# cat /etc/sysconfig/network-scripts/ifcfg-eth1
DEVICE=eth1
NM_CONTROLLED=no
TYPE=Ethernet
IPADDR=172.34.0.2
PREFIX="24"
BOOTPROTO=static
ONBOOT=yes
开始:eth1
ifdown eth1 && ifup eth1
IPv6 节点设置
通过编辑文件设置 ipv6 地址:eth1ifcfg-eth1
[root@ipv6 ~]# cat /etc/sysconfig/network-scripts/ifcfg-eth1
DEVICE=eth1
NM_CONTROLLED=no
TYPE=Ethernet
BOOTPROTO=static
ONBOOT=yes
IPV6INIT=yes
IPV6ADDR=2001:a:b:c::2/64
通过创建文件设置到 NAPTD 虚拟网络的路由:route6-eth1
[root@ipv6 ~]# cat /etc/sysconfig/network-scripts/route6-eth1
2000:ffff::/64 via 2001:a:b:c::1
开始:eth1
ifdown eth1 && ifup eth1
设置 NAT-PT 网关节点
配置 IPv4 和 IPv6 接口
设置 ipv6 地址:eth1
[root@natpt ~]# cat /etc/sysconfig/network-scripts/ifcfg-eth1
DEVICE=eth1
NM_CONTROLLED=no
TYPE=Ethernet
BOOTPROTO=static
ONBOOT=yes
IPV6INIT=yes
IPV6ADDR=2001:a:b:c::1/64
设置 ipv4 地址:eth2
[root@natpt ~]# cat /etc/sysconfig/network-scripts/ifcfg-eth2
DEVICE=eth2
NM_CONTROLLED=no
TYPE=Ethernet
IPADDR=172.34.0.1
PREFIX="24"
BOOTPROTO=static
ONBOOT=yes
启动和端口:eth1eth2
ifdown eth1 && ifup eth1
ifdown eth2 && ifup eth2
安装和配置naptd
从 http://tomicki.net/naptd.download.php 下载 RPM 软件包
安装 rpm 包:naptd
yum install naptd-0.4-1.i386.rpm
它还从 RHEL7 基本操作系统存储库安装一些依赖项,因此请确保已配置该存储库。
安装 ,需要通过以下方式:iptablesnaptd
yum install iptables
运行以生成配置文件,这是一个交互式工具,可以询问您有关要如何使用的几个问题:naptd-confmakernaptdnaptd
[root@natpt ~]# naptd-confmaker
Ataga IPv4/IPv6 NAPT Configuration Maker
(c) 2005 by Lukasz Tomicki <tomicki@o2.pl>

Do you want to create a new configuration? [Y/n]

Do you want IPv4 addresses from the outside interfaces to be automatically used as part of the NAT pool? [Y/n]

Do you want to configure additional address as part of your NAT pool? [y/N]
n
Do you want to create a pool of public IPv4 addresses that will allow incoming connections to be dynamically mapped to appropriate IPv6 addresses? [y/N]
n
Do you want to create static mappings of public IPv4 addresses that will allow incoming connections to reach IPv6 hosts? [y/N]
y
IPv4 address: 172.34.0.102
IPv6 address: 2001:a:b:c::2

Do you want to enter another static mapping? [y/N]
n
Enter the name of the first inside (IPv6) interface that you want NAT-PT to listen on.
interface (eth0 eth1 eth2): eth1

Do you want to enter more interfaces? [y/N]
n
Enter the name of the first outside (IPv4) interface that you want NAT-PT to listen on.
interface (eth0 eth1 eth2): eth2

Do you want to enter more interfaces? [y/N]
n
Enter the TCP translation timeout in seconds [86400]:
Enter the UDP translation timeout in seconds [3600]:
Enter the ICMP translation timeout in seconds [30]:

Enter the IPv6 prefix that will be used as the destination for translations.
prefix [2000:ffff::]:

Please enter the IPv4 address of the DNS server you are currently using.
IPv4 DNS server: 127.0.0.1

You can configure hosts for automatic DNS translation by using the DNS server below.
IPv6 DNS Server: 2000:ffff::7f00:1

Thank you for choosing Ataga as you IPv4/IPv6 NAT-PT solution.
Setup is now complete. Type 'naptd' to start NAT-PT.
必要的设置和规则使工作:iptablesip6tablesnaptd
ip6tables -A OUTPUT -p icmpv6 --icmpv6-type 1 -j DROP
ip6tables -A FORWARD -d 2000:ffff:: -j DROP

iptables -A INPUT -i lo -j ACCEPT
iptables -A INPUT -m state --state NEW -m tcp -p tcp --dport 22 -j ACCEPT
iptables -A INPUT -m state --state ESTABLISHED,RELATED -j ACCEPT
iptables -A INPUT -j DROP
最后,启动守护进程:naptd
[root@natpt ~]# naptd
Going daemon. Check syslog messages for runtime information.
您应该会看到一些日志,例如:
[root@natpt ~]# tail -n 20 /var/log/messages
Jan 27 00:44:36 natpt naptd[2229]: Starting NAT-PT.
Jan 27 00:44:36 natpt naptd[2230]: Initializing Application Level Gateways.
Jan 27 00:44:36 natpt naptd[2230]: Loaded Domain Name Service plugin.
Jan 27 00:44:36 natpt naptd[2230]: Loaded File Transfer Protocol plugin.
Jan 27 00:44:36 natpt naptd[2230]: Dispatching threads.
Jan 27 00:44:36 natpt kernel: device eth2 entered promiscuous mode
Jan 27 00:44:36 natpt kernel: device eth1 entered promiscuous mode
Jan 27 00:44:37 natpt naptd[2230]: Loading IPv4 routes into cache.
Jan 27 00:44:37 natpt naptd[2230]: Loading IPv6 routes into cache.
Jan 27 00:44:37 natpt naptd[2230]: Dropping root privileges.
Jan 27 00:44:37 natpt naptd[2230]: NAT-PT initialized.
尝试从 IPv4 节点连接 IPv6 节点
现在我们已经设置好了所有内容,我们知道我们有一个静态映射,它将172.34.0.102映射到2001:a:b:c::2,所以让我们尝试通过这个网关pingIPv6节点:
[root@ipv4 ~]# ping 172.34.0.102
PING 172.34.0.102 (172.34.0.102) 56(84) bytes of data.
64 bytes from 172.34.0.102: icmp_seq=1 ttl=63 time=0.703 ms
64 bytes from 172.34.0.102: icmp_seq=2 ttl=63 time=0.759 ms
64 bytes from 172.34.0.102: icmp_seq=3 ttl=63 time=0.544 ms
64 bytes from 172.34.0.102: icmp_seq=4 ttl=63 time=0.688 ms
^C
--- 172.34.0.102 ping statistics ---
4 packets transmitted, 4 received, 0% packet loss, time 3000ms
rtt min/avg/max/mdev = 0.544/0.673/0.759/0.083 ms
它的工作原理!!!
我们可以更详细地了解它是如何工作的。
从 NAT-PT 网关节点,我们可以 tcpdump IPv4 端口来查看 IPv4 端数据包:
[root@natpt ~]# tcpdump -nni eth2 arp or icmp
01:38:18.859504 ARP, Request who-has 172.34.0.102 tell 172.34.0.2, length 28
01:38:18.859569 ARP, Reply 172.34.0.102 is-at 52:54:00:93:2a:7e, length 28
01:38:18.859741 IP 172.34.0.2 > 172.34.0.102: ICMP echo request, id 2211, seq 1, length 64
01:38:18.860216 IP 172.34.0.102 > 172.34.0.2: ICMP echo reply, id 2211, seq 1, length 64
因此,我们可以看到首先响应 ARP 请求 172.34.0.102,然后我们看到 icmp 请求和回复数据包飞来飞去。naptd
IPv6 端怎么样?让我们来看看:
[root@natpt ~]# tcpdump -nni eth1 icmp6
01:42:37.688777 IP6 2000:ffff::ac22:2 > 2001:a:b:c::2: ICMP6, echo request, seq 1, length 64
01:42:37.689107 IP6 2001:a:b:c::2 > 2000:ffff::ac22:2: ICMP6, echo reply, seq 1, length 64
01:42:38.689037 IP6 2000:ffff::ac22:2 > 2001:a:b:c::2: ICMP6, echo request, seq 2, length 64
01:42:38.689478 IP6 2001:a:b:c::2 > 2000:ffff::ac22:2: ICMP6, echo reply, seq 2, length 64
我们可以看到在IPv6端,源IP被替换为,这是一个虚拟的IPv6网络用来做SNAT。 是在运行期间定义的前缀。2000:ffff::ac22:2naptd2000:ffffnaptd-confmaker
- Get link
- X
- Other Apps

Comments
Post a Comment